If you're a compromised Evernote user, you likely have a ton of information stored in your account that, if lost, would be a catastrophe.
Granted, Evernote stores your notes locally on your machine, as well as on their own servers. This means that if you accidentally delete Evernote from your PC, you can easily download the latest synced version of your notebooks for your next Evernote installation. You'll be up and running again in no time.
But is this really enough? Well, probably not:
As unlikely as these scenarios are, the safest course of action is to regularly back up your Evernote content. As long as you have those backups, all your notes should always be recoverable.
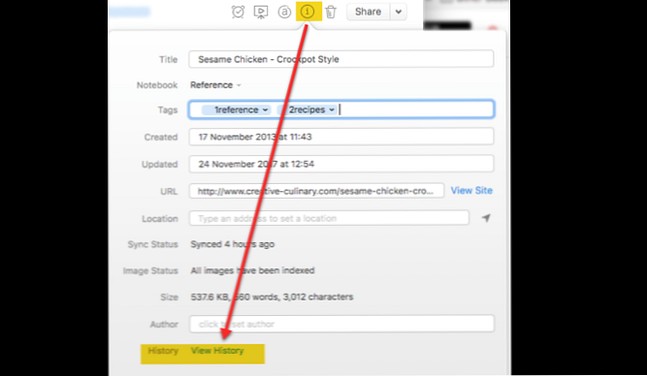
If you are an Evernote Premium user, you must be aware of the Note History feature. If you ever accidentally delete a section of a note and need to recover that content, this is the most convenient option.
To retrieve a previous version of a note, simply go to the note in question, click me on the toolbar, then click View History . Choose the version of the note that you want to import back into Evernote. It's that simple.
However, this is not exactly a fail-safe backup. You're still completely relying on Evernote to store this data for you. To ensure a reliable backup is on your own hands continue reading.
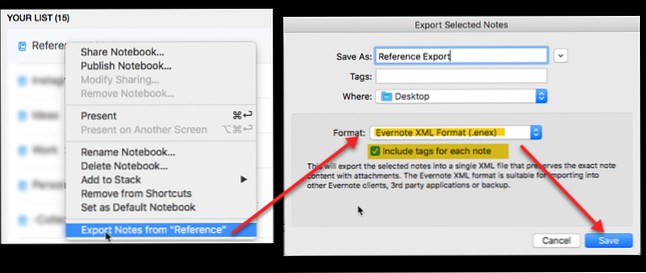
This is by far the best option open to you. Evernote for Windows and Mac has a built-in export feature within the desktop app. This allows you to export single or multiple notes, or even entire notebooks (one at a time). If you regularly save those exports to a cloud service or external drive, you'll be well on your way to making sure you don't lose your data.
On Windows
On mac
These .ENEX files are formatted so your notes (and tags) can be easily restored to Evernote at any time. They don't back up note links or laptop stacks. You'd have to manually add these back in when the time comes.
Unfortunately, you can only export one notebook at a time. If you organize Evernote using this scalable system The best way to organize Evernote:Use tags The best way to organize Evernote:Use tags Is your Evernote a big mess? We show you a simple tweak that will help you organize your notes like never before. Read More It is not a big thing. But if you have a lot of notebooks, this can take a while.
Note: Only choose to export as an HTML file if you want the backup to work independently of Evernote. Importing this file into another service will be more complicated. Also, it will not include any tags assigned to the notes.
Within Evernote go to File> Import, and select the .ENEX files you want to import. Be sure to check the import tags box, then click Open . Your notes will be imported into a new notebook.
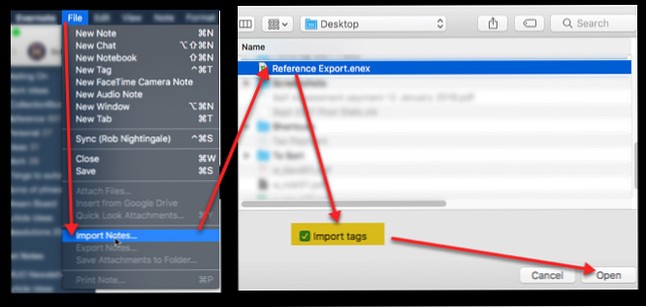
You can then copy or move these imported notes to any notebook you like.
It goes without saying that you should back up your entire PC in case disaster strikes. For this, Windows has Backup and Restore The Windows Backup and Restore Guide The Windows Backup and Restore Guide Disasters happen. Unless you're willing to lose your data, you need a good Windows backup routine. We'll show you how to prepare backups and restore them. Read more . Mac Users Have Time Machine How to Restore Data from Time Machine Backups How to Restore Data from Time Machine Backups It's really easy to set up Time Machine, the backup software that comes with every Mac, but how do you recover? your files when everything works? incorrect? Read more.
If you back up everything on your PC, your Evernote database should be included by default.
If you're only backing up certain folders, you'll want to make sure your Evernote database is included as well. For this, you will need to point your backup application to your Evernote database.

On Windows
You can find your database location via Tools> Options> General> Local Evernote Files . The default location is:c:\Users [username]\Evernote
On mac
You can find your database location by holding Option within Evernote, then clicking Help> Troubleshooting> Open Database Folder .
DO NOT CHANGE ANYTHING IN THIS FOLDER!
Note that going anywhere near your local database is massively discouraged by Evernote. Small changes can make a database unusable. Also, restoring your account from this database backup is quite complicated.
Follow the following instructions at your own risk..
Evernote support told us that if you ever need to restore a database folder from an automatic backup via Backup and Restore or Time Machine, you should submit a support ticket, and the Evernote support will guide you through the process.
There are two main reasons why this process is quite complicated:
However, if you ever wanted to do it yourself (not recommended), here's the process Evernote Support gave us:
With this process, you are temporarily restoring an old database and taking notes that you want to restore permanently. Once Evernote has synced with the version on the web, it will import the notes you want to restore.
It's clunky, but it's a last resort in case your database gets lost or corrupted. All you need to do is make sure to back up your Evernote database every time you back up your PC.
With each of us having so much valuable data stored on our devices, and within Evernote, it's important to know that it's backed up securely.
With a proper system in place, you can make sure your photos stay safe Automatically back up your photos with these 8 tools Automatically back up your photos with these 8 tools Not sure what the best tools are that allow you to back up all photos automatically on your PC? Don't worry, we've listed our top eight. Learn more, WhatsApp Messages How to Backup WhatsApp Messages to Google Drive How to Backup WhatsApp Messages to Google Drive The latest WhatsApp update makes it easy to do automatic backups to Google Drive. Here is how to get it. Backups are backed up, emails are stored securely and backing up your Microsoft Outlook emails is made easy and Microsoft Outlook emails are backed up. Microsoft Outlook. We show you how simple the process of archiving and storing emails can be. Read More
This will protect you in case any of the services you use lose or delete your data. As they say, it's better to be safe than sorry.
Do you regularly back up your Evernote notes? If not, why?