Excel is the king of spreadsheet programs Excel Vs. Google Sheets:Which is better for you? Excel vs. Google Sheets:Which is better for you? Do you really need Excel? Both desktop and online solutions have their advantages. If you're having trouble choosing between Excel and Google Sheets to manage your spreadsheets, let us help you decide. Read More And other times, you'll need to save your document in a different format so people who don't use Excel can use it.
Importing and exporting data in Excel sounds like a complicated process, but it's actually quite easy once you've done it a couple of times. Here's what you need to know.
No matter what kind of data you're importing, you'll start the process the same way. Hit File> Import To get started. You will see this pop-up window, which will allow you to choose the format of the original file you want to import:
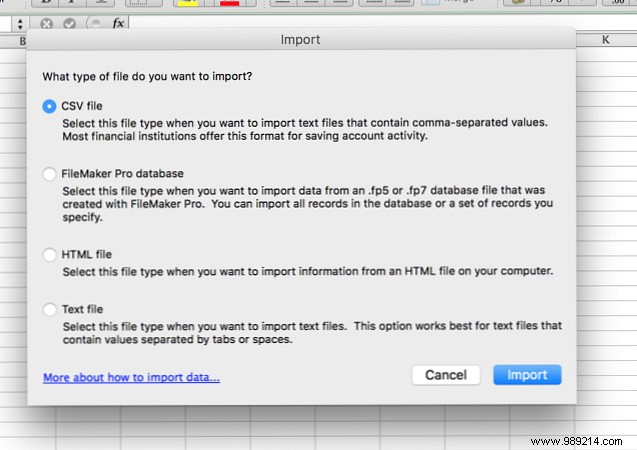
This dialog box gives you the option to import comma-separated values (CSV), FileMaker Pro, HTML, and text files. If you want to import another type of spreadsheet file, your best bet is to export the spreadsheet in a different format than the original program. Most programs should have no difficulty exporting to CSV or text. I'll use a CSV in this example because it's a common data format, used for everything from research data to social media contact spreadsheets. How to Backup Your Facebook Contacts to Any Email Account [Weekly Facebook Tips] How to Backup Your Facebook Contacts to Any Email Account [Weekly Facebook Tips] Facebook makes a lot of aspects of your life more convenient. It's an easy way to stay in touch, it reminds you of your friends' birthdays, and you can sync your Facebook contacts and events with your… Read more
Click Import , and you will see the Text Import Wizard:

Excel's Text Import Wizard does its best to make this process easy, and for the most part, it works really well. Most of the time, you're just going to hit Next> until the wizard disappears and your data appears in the spreadsheet. As you can see in the image above, the text wizard determined that this file is delimited:each cell is separated by a comma. Because this is correct, we can only hit Next> to continue with the import (if you're not, read on for tips on fixed-width import).
The second step allows you to choose a number of different options related to delimitation that will help ensure that your data imports correctly:
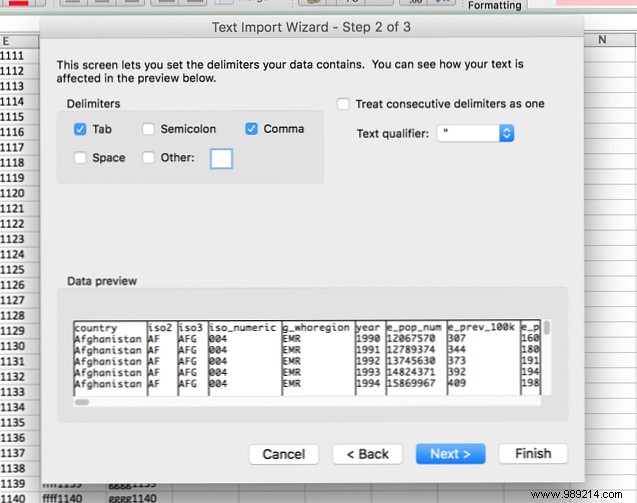
First, you can choose your delimiter. The data I'm importing here uses commas to separate cells, so I'll leave it Comma selected. Tab It's also selected, and it doesn't have an adverse effect on this import, so I'm leaving it alone. If your spreadsheet uses spaces or semicolons to differentiate between cells, simply select that option. If you want to split the data at another character, such as a slash or a period, you can enter that character in the Other: box.
Treat consecutive delimiters as one the box does exactly what it says; in the case of commas, having two commas in a row would create a single new cell. When the box is unchecked, which is the default, two new cells would be created.
The Text qualifier The box is important; when the wizard imports a spreadsheet, it will treat some of the cells as numbers and some as text. The character in this box will tell Excel which cells should be treated as text. Normally, there will be quotes (” “) around the text, so this is the default option. Text qualifiers will not display in the final spreadsheet. You can also change it to single quotes ("") or none at all, in which case all quotes will remain in place when imported into the final spreadsheet.
Once everything looks good, hit Next> to go to the final step, which allows you to set data formats for imported cells:
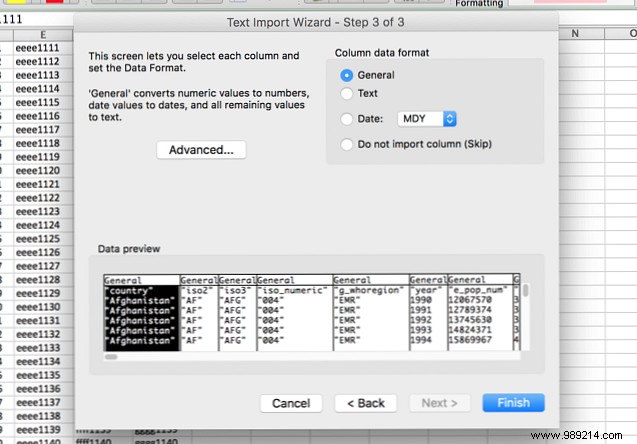
The default value for the Column Data Format is General , which automatically converts data to numeric, date, and text formats. For the most part, this will work fine. However, if you have specific formatting needs, you can select Text or Date: . The date option also allows you to choose the format in which the date is imported. And if you want to skip specific columns, you can do that too.
Each of these options applies to a single column or multiple columns if you Shift-click to select more than one. It can be time-consuming to loop through all the columns this way if you have a giant spreadsheet, but it can save you time in the long run if all your data is formatted correctly the first time you import it.
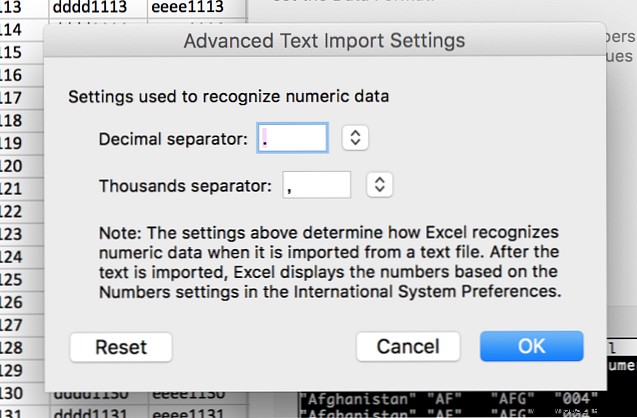
The last option in this dialog is the Advanced Menu, which allows you to adjust the settings used to recognize numeric data. The default value uses a period as the decimal separator and a comma as the thousands separator, but you can change this if your data is in a different format.
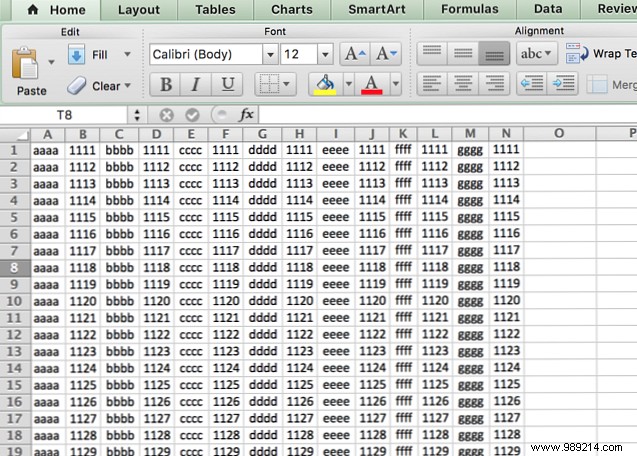
After those settings are marked to your liking, just press Finish and the import is done.
If Excel makes a mistake when delimiting your data, or if you are importing a text file without delimiters, you can choose Fixed Width instead of Delimited in the first step. This allows you to separate your data into columns based on the number of characters in each column. For example, if you have a spreadsheet full of cells containing codes with four letters and four numbers, and you would like to split the letters and numbers between different cells, you can choose Fixed Width and set the split after four characters:
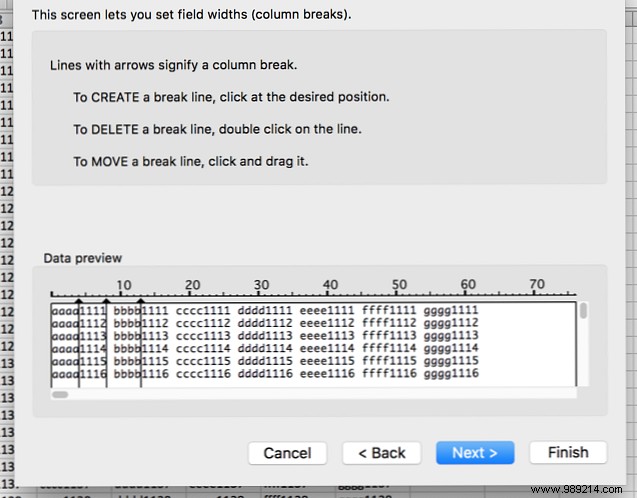
To do this, select Fixed Width and click Next> . In the next dialog box, you can tell Excel where to split the data into different cells by clicking on the displayed data. To move a split, just click and drag the arrow at the top of the line. If you want to remove a split, double click on the line.
After selecting your splits and hitting. Next> , obtendrá las mismas opciones que tendría en la importación delimitada; Puede seleccionar el formato de datos para cada columna. Entonces pulsa Terminar y obtendrás tu hoja de cálculo.
Además de importar archivos no delimitados, esta es una buena manera de dividir texto y números Cómo extraer un número o texto de Excel con esta función Cómo extraer un número o texto de Excel con esta función Mezclar números y texto en una La hoja de cálculo de Excel puede introducir desafíos. Le mostraremos cómo cambiar el formato de sus celdas y números separados del texto. Lee más de los archivos con los que estás trabajando. Simplemente guarde el archivo como un archivo CSV o de texto, importe ese archivo y use este método para dividirlo como desee..
Importar HTML es lo mismo que importar archivos CSV o de texto; seleccione el archivo, siga las mismas opciones anteriores y su documento HTML se transformará en una hoja de cálculo con la que puede trabajar (puede resultarle útil si desea descargar tablas HTML de un sitio web, o si los datos del formulario web son guardado en formato HTML).
Exportar datos es mucho más simple que importarlo. Cuando estés listo para exportar, pulsa Archivo> Guardar como ... (o use un atajo de teclado de Excel práctico 35 Atajos de teclado diarios de Microsoft Excel para Windows y Mac 35 Atajos de teclado cotidianos de Microsoft Excel para atajos de teclado de Windows y Mac puede ahorrarle mucho tiempo. Use estos atajos de Microsoft Excel para acelerar el trabajo con hojas de cálculo en Windows y Mac. Lea más), y se le presentarán una serie de opciones. Simplemente elige el que necesites..
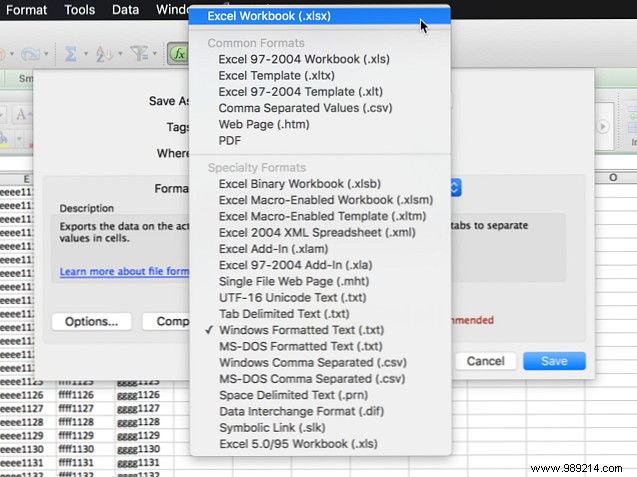
Aquí hay un desglose de algunos de los más comunes:
Cuando seleccionas un formato y pulsas Salvar , puede recibir una advertencia que se ve así:
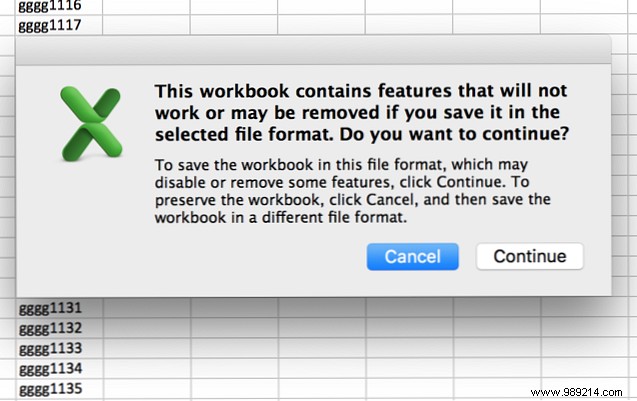
Si está buscando guardar su archivo como algo que no sea .xlsx o .xls, es probable que esto suceda. A menos que haya características específicas que realmente necesite en su hoja de cálculo, simplemente presione Continuar y su documento será guardado.
En su mayor parte, la gente solo usa hojas de cálculo con formato Excel, y es muy fácil de abrir, modificar y guardar. Pero de vez en cuando obtendrá un tipo diferente de documento, como uno extraído de la web o generado en una suite de Office diferente. Which Office suite is the best for you? Which office suite is best for you? You will be pressured to find an occupation that does not require word or number processing of any kind. And you may be wondering, is Microsoft Office really the best solution? Here are your options. Read more . Saber cómo importar y exportar diferentes formatos puede hacer que trabajar con este tipo de hojas sea mucho más conveniente.
¿Importa o exporta archivos de Excel de forma regular? ¿Para qué te parece útil? ¿Tiene algún consejo para compartir o problemas específicos para los que aún no ha encontrado una solución? Compártelos abajo!